There are many ways to use the HTML/ Javascript Gadget in Blogger. It is one of my all time favorite Gadgets because it allows me to customize my blog in a way that other gadgets do not.
The first gadget hack, isn't really a hack but some people may not know how to add social media plugins to their blogs.
Add an HTML gadget and find the social media gadget you would like to install, whether it be Facebook, Twitter, Pinterest, or Instagram. Then copy the HTML code and paste it into the HTML gadget.
If you know the widths of your sidebar customizing this feature should be really easy. For example: if your side bar width is 250 you would set the width of your social media plug in to 230 or even 225.
Okay, now we forward march onto a real hack!
Do you want an image on your blog with cute social media icons that has different areas that click through to different links?
I will now introduce you to Image Mapping!
The very first thing you have to do is set up a private image page (just make the page and keep it to yourself). Then add the image that you want to be clickable. Now, open that page and right click on the image. You should see the image on a page all by its lonesome with a black, or dark gray background. The URL of that page is the image URL. This is very important.
Before you can even think about image mapping you must have your image hosted somewhere on the world wide web. Some people use flickr or other photo hosting websites but since I already use Blogger I just use the image page concept and that helps me keep my blog images organized and all contained within my blog.
So, now click here to use the image mapper on isdntek.com. Its free, and compared to others out there fairly simple.
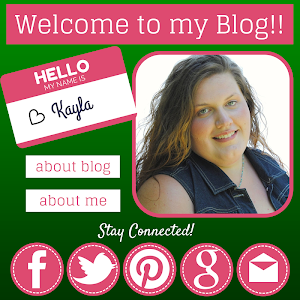
Why would you want to map an image?The image below is a prime example of why image mapping is so cool! This is the welcome image I use on ApotheKayla.

With the image mapping tool from isdntek.com you paste the image URL into the Image URL field and click load image. Then you will click new link, this is the fun part!
Drag the transparent gray box over the spot on the image that you want people to be able to click on, the Facebook logo for instance, then type in the link to your facebook page!
You can add in as many links as you like. In the image above (the ApotheKayla welcome image) I have seven links mapped in one photo. On the WinterStead welcome image I have two.
This tool is also great if you want to link an entire image, such as the "Got EO" image to the left, to a page, or external link. Just make the gray transparant "hotspot" box cover the entire image.
Also if the image is larger than your side bar once you click make code you can edit the width by deleting the width in quotations and adding your own.
If you want an image without a link in your side bar then you can either click HTML next to Compose at the top of your image page or blog post and select the HTML code for the image you want; or you can get the image URL, load it into the image mapper, and click make code without adding any links!
To instal the code into your layout you add an HTML/Javascript gadget and past the code into that box. If you get frustrated by the extra space created by the code just delete the <br/> (this code means break) from the code anywhere you see it and the extra spaces should be removed.
So technically this blog post has a few gadget hacks in it! If you are curious about more gadget hacks or blog tips feel free to join me, and my other Blogger blogger friends in my Facebook group Blogger bloggers: Learn and Share!
Thanks for reading and until next time, Keep Calm and Blog About it!


